
Adding Hopper Ladders to HO Models by Tom Winlow
This article doesn’t refer to a specific car. Rather, it shows how improvements may be made to older hopper and covered hopper cars.
 One of the big improvements you can make to freight cars is to replace the cast-on grabs by wire ones. For box cars and similar vehicles this is comparatively easy. Just shave off the cast-on ones and substitute appropriate wire grabs from Tichy Trains, Detail Associates or one of the other suppliers. For hoppers and covered hoppers, fitting wire grabs is a big problem. The most difficult part concerns the corner posts. The many holes needed for all the wire grabs weaken the plastic so much that a breakage is almost inevitable. This article describes an alternative approach using thin plastic rod.
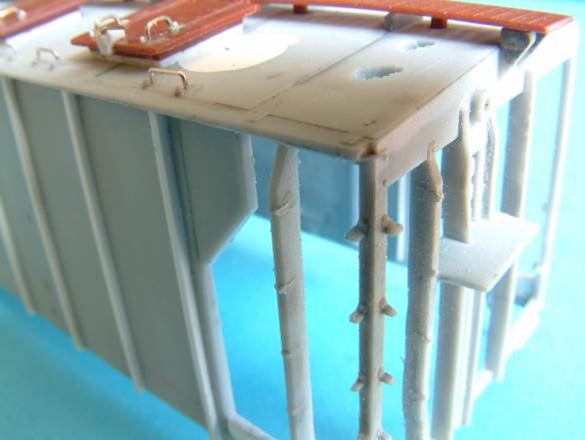
The photo shows “before and after” picture using Atlas 2-bay covered hoppers. The LNE car at the rear has unmodified end ladders. These look good side-on, but from this angle… oh dear! They look like flat steps rather than round rungs. The Lehigh Valley car in the foreground has been modified using thin plastic rod as described below.
The modifications aren’t too difficult; just fiddly. However, you do need a steady hand and I have found it necessary to use a magnifier. Mine is an “Optivisor”. The rungs can be either 0.010” or 0.015” round plastic rod. The thinner rod is closer to scale but the .015” is much stronger. It is your choice. I have used 0.015” rod from both Evergreen and Plastruct, but so far I have only found 0.010” rod at Plastruct.
If you are careful, it is possible to make these modifications on a decorated car and touch up by brush or airbrush later. This was done on the car in the photo above. Even if you can’t match the colour exactly, weathering will help hide this.

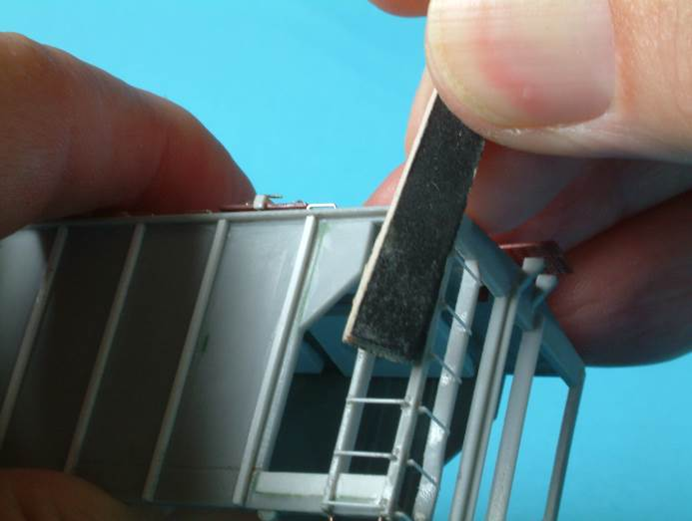
1. The first job is to remove the existing rungs. A quick way is to cut them out with side cutters. However, this tends to push the vertical posts outwards and may leave them bowed. A better way is to carefully pare through the rung using a sharp modelling knife. In the photo, the third rung down has been pared away at 45 degrees until it has become separated from the right hand upright. The rung can now be clipped off using side cutters without affecting the uprights. It will then look like the second rung down.
2. Once all the rungs have been removed, the inner sides of the uprights can be smoothed. I used an emery board intended for filing finger nails. It will also be necessary to lightly file away the top surface of the “stumps”. Ideally you would remove an amount equal to the thickness of the plastic rung that is to be applied but you can only make your best guess at this. If you are working on an already-painted model this sanding will also remove the paint so you can attach the new rungs with solvent cement.

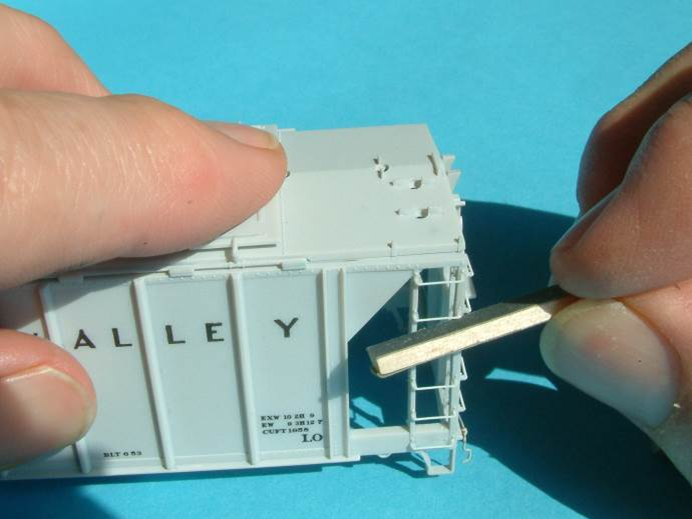
3. The rungs are made from either 0.010” or 0.015” plastic rod. As mentioned earlier, the thinner type is closer to scale but the thicker type will be twice as strong. Each rung is attached by putting a drop of solvent on the stumps and allowing it to soften the plastic. For this job, a slow-drying solvent like Liquid Poly is better than an ultra-fast one, like Tenax 7R or MEK . As the rung is added it can be pressed slightly into the softened plastic “stump” and another drop of solvent used to complete the joint.
Fitting extra-long rungs at this stage, as shown, makes it easy to see if any are out of line. In the photo the second one down has been deliberately misaligned to show how clearly it stands out.
I allow the solvent to set overnight and then reinforce the joint using a tiny drop of gap-filling ACC, applied with a piece of 0.010” wire (see “6” below for details). The excess rung can be trimmed with a fresh, sharp modelling knife.
4. The next step is optional but really changes those bits of plastic rod into something looking more like ladder rungs. The ends of the plastic rods ends can be rounded with a fine sanding stick (above), as can the undersides of the corners (below).
5. As you do the sanding you may find that one or two of the glued joints break. They can easily be re-glued. Better to find out now you have a weak joint than later when everything is painted.
Here’s a picture of the finished ladder. It is possible to make this modification to a decorated car and touch in the new rungs either by brush or airbrush

6. Once the rungs have been improved, the thick plastic bars at the opposite corners from the ladders will stand out like sore thumbs. You could improve these using the same plastic rod as the ladders. However, this is really too weak because of the length involved. Another option would be brass wire, but I used the very thin springy steel wire used as guitar strings. This is very strong and its springiness resists bending. Music stores sell these strings and they come in diameters from 0.007” to 0.024” in 0.001 steps, so you can choose one that matches your ladder rungs. I drilled holes and secured the wire with acc.

The modifications I have described are the de-luxe version. You could take a simpler approach. For example, you could skip the rounding of the ends of the rods, or you could completely remove the “stumps” and glue the rod directly onto the uprights. You could also decide this whole business is total lunacy and isn’t for you. There isn’t a “right answer”. After all, it’s your railroad and your modelling time. Over a couple of years I have gradually built a “cement train” of 12 covered hoppers, modifying all of them like this as I went along. I also had a pre-existing 22-car train coal train, none of which are modified. So, am I going to sit down and modify all that lot? You must be joking!