11th Avenue
-
BrianMoore

- Posts: 384
- Joined: Fri Jul 03, 2009 7:05 pm
- Location: Plymouth, UK
Re: 11th Avenue
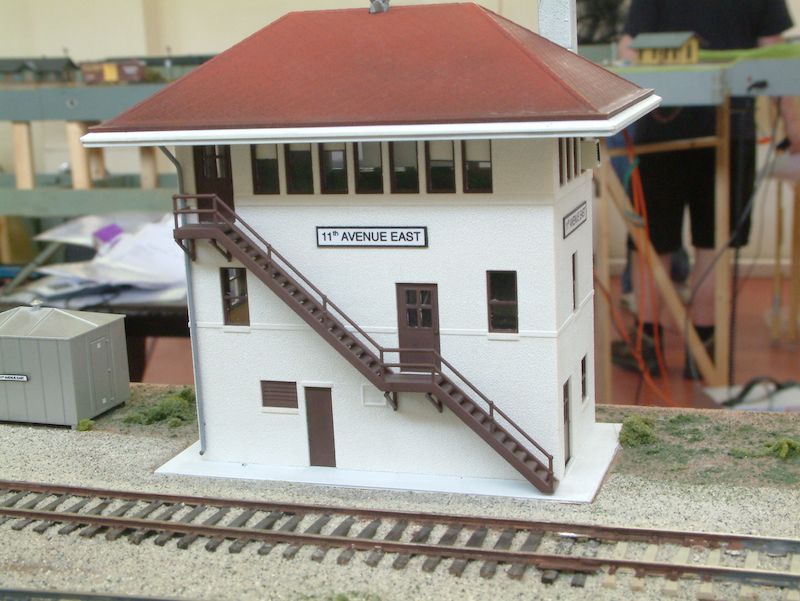
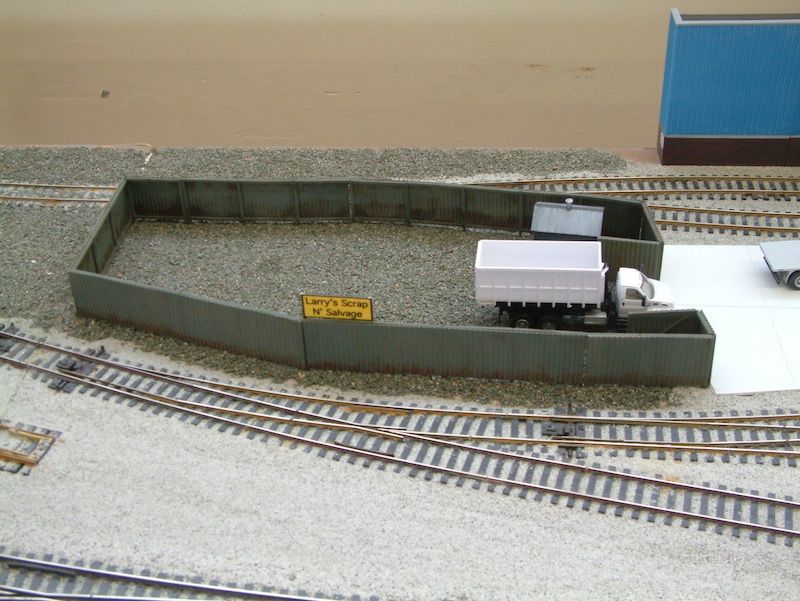
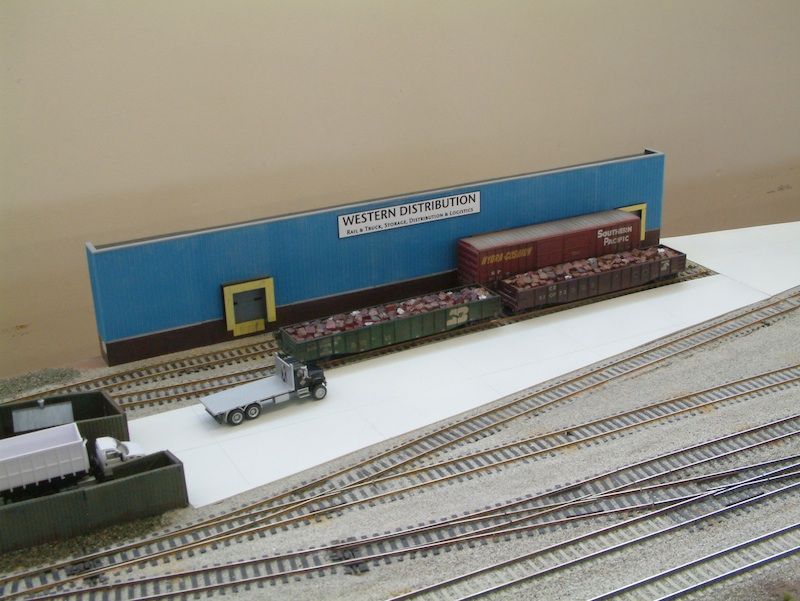
I have been working on the East end of 11th Avenue.
The tower now has signs.
A new scrap yard has been built, still to be filled with scrap.
Western Distribution has a new structure, Walthers Bud's trucking Co.
The East end overall. All industries now have signs.
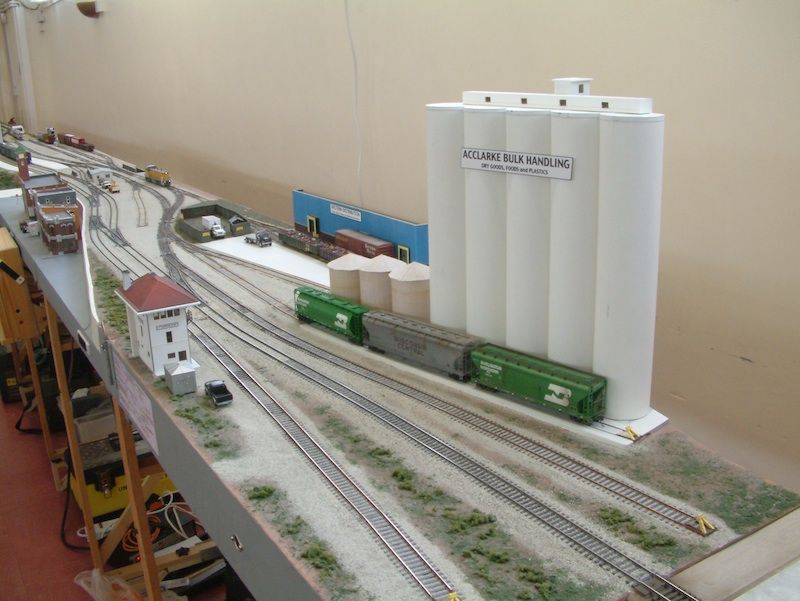
Further up is a new yard office.
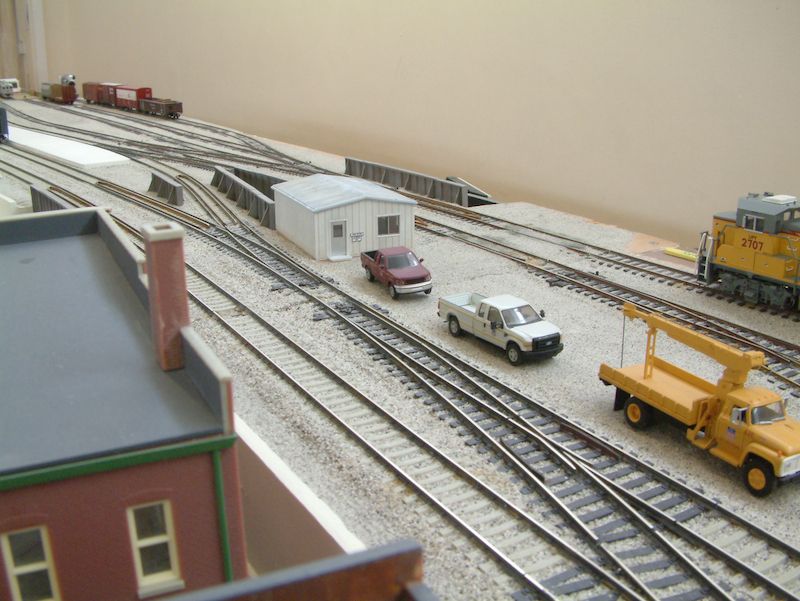
I still have to bed it into the scenery and fit an interior.
The tower now has signs.
A new scrap yard has been built, still to be filled with scrap.
Western Distribution has a new structure, Walthers Bud's trucking Co.
The East end overall. All industries now have signs.
Further up is a new yard office.
I still have to bed it into the scenery and fit an interior.
Mike Ruby
Re: 11th Avenue
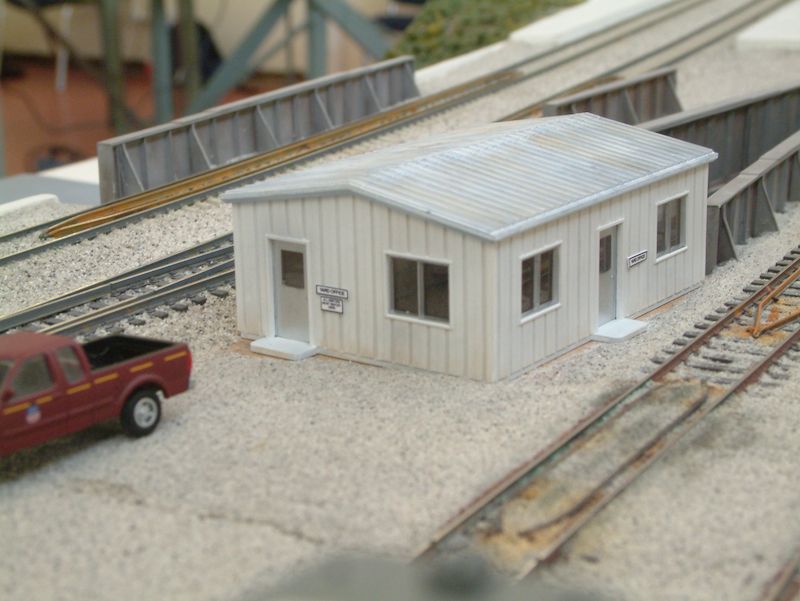
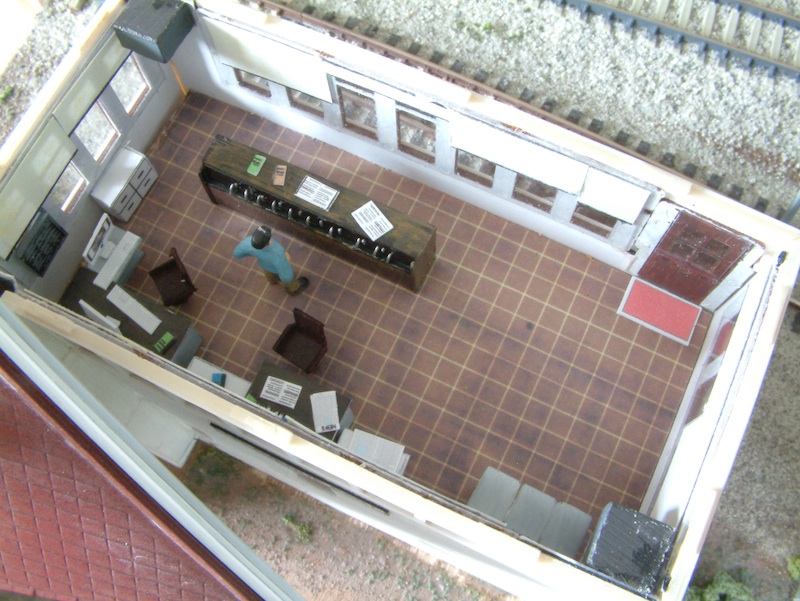
Further to my Yard office, I've now finished the interior.
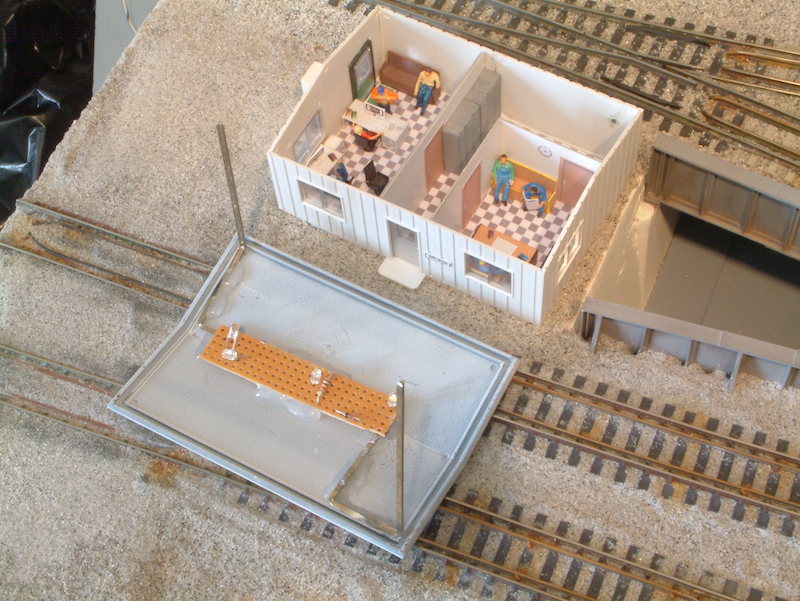
The roof with lighting board. The lighting is not bright but in a dark room shows the inside well.
 11th Avenue Yard office 3 by Mike Ruby, on Flickr
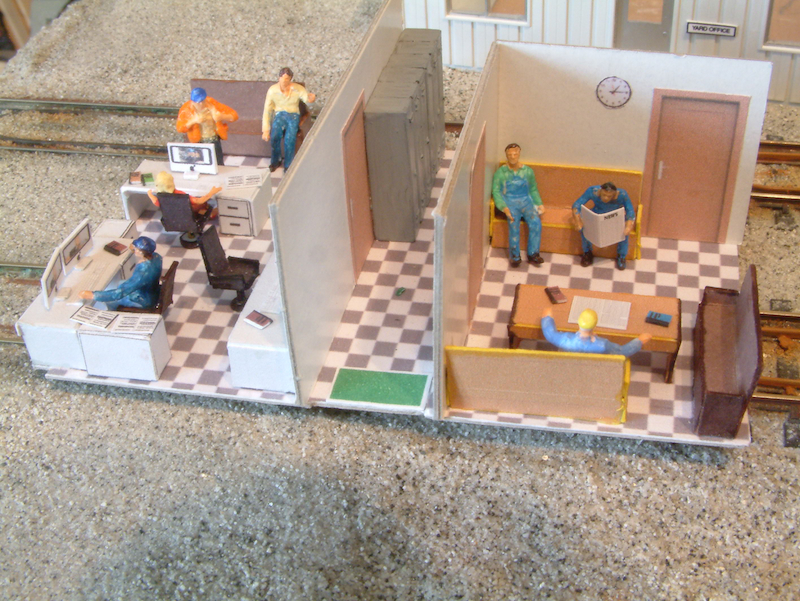
A close up of the interior. The office on the left and crew lounge at right.
The furniture and details are printed on card, including desks, seats, computers, books and newspapers.
 11th Avenue Yard office 2 by Mike Ruby, on Flickr
The outside now bedded into the scenery and with protective rails.
 11th Avenue Yard office 1 by Mike Ruby, on Flickr
The roof with lighting board. The lighting is not bright but in a dark room shows the inside well.
11th Avenue Yard office 3 by Mike Ruby, on FlickrA close up of the interior. The office on the left and crew lounge at right.
The furniture and details are printed on card, including desks, seats, computers, books and newspapers.
11th Avenue Yard office 2 by Mike Ruby, on FlickrThe outside now bedded into the scenery and with protective rails.
11th Avenue Yard office 1 by Mike Ruby, on Flickr
Last edited by Mike_R on Sat Mar 03, 2018 9:33 pm, edited 1 time in total.
Mike Ruby

Re: 11th Avenue
Looking great Mike.
Sent from my iPhone using Tapatalk
Sent from my iPhone using Tapatalk
Koos Fockens -Devon UK. North American Model Railroading
Age is just a case of mind over matter. If you don't mind, then it doesn't matter.
Age is just a case of mind over matter. If you don't mind, then it doesn't matter.
Re: 11th Avenue
I've detailed the interior of 11th Avenue East tower.
A close up of the tower front
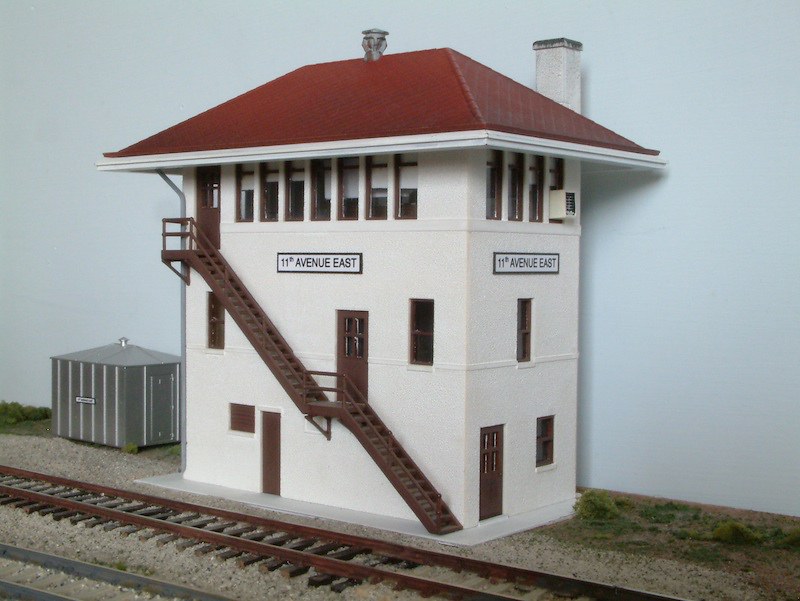
The interior the two black cubes in the corners are the magnets that hold the roof on.
The grill on the left hand window lines up with the air conditioner mounted on the outside.
The tower is now lit, both inside and exterior flood lights
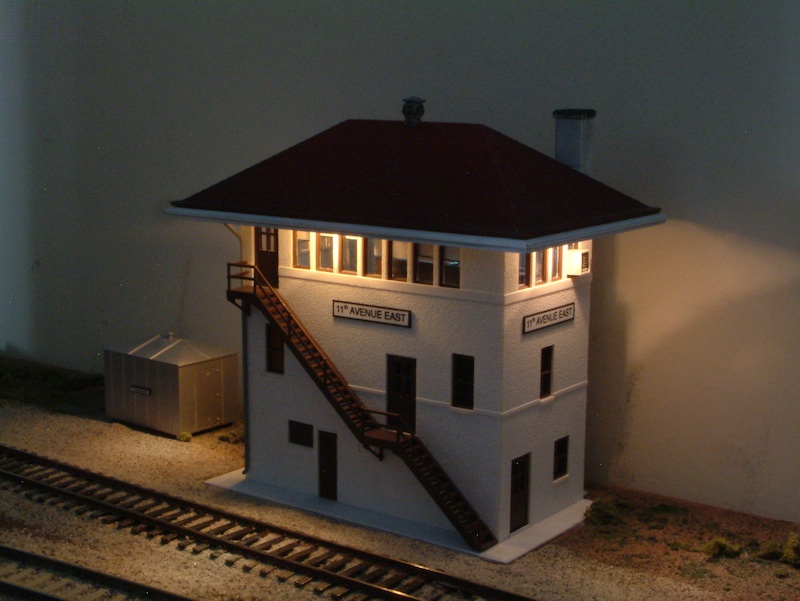
As with the yard office the interior lights are not very bright, but does allow the interior to be seen.
The lower floors have black card partitions to stop views through the building.
A close up of the tower front
The interior the two black cubes in the corners are the magnets that hold the roof on.
The grill on the left hand window lines up with the air conditioner mounted on the outside.
The tower is now lit, both inside and exterior flood lights
As with the yard office the interior lights are not very bright, but does allow the interior to be seen.
The lower floors have black card partitions to stop views through the building.
Mike Ruby
Re: 11th Avenue
Thanks, it does show how a layout can evolve and change as requirements change over the years. Although it could still operate as the original 12' double track module if ever required. After all these years it is getting closer to being finished, just the station buildings have to be started, that will be a big job as they will have full interior detailing and lighting. Other structures need finishing, but at least externally are nearly there
Mike Ruby
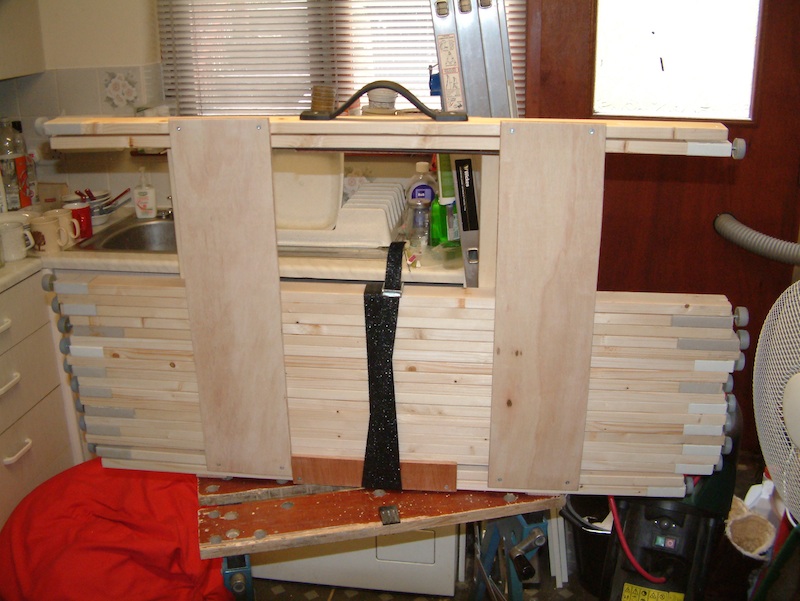
New legs
The legs for my modules were taking up too much room to transport, so I started making single legs instead of the more common H type. Some boards have had the new legs for several months with no problems showing up.
I made new legs for the other boards, but realisied that they wouldn't fit one board which has a drop front. I had originally planned to make some clip on cross braces to steady the module so instead made two new H legs (the old ones had extenders to go from 40" to 45" making them more wobbly), this time with ply panels instead of diagonals to steady them. Instead of wasting the space between the legs I have filled it with the single legs. A few bits of ply to lock them together a handle on one leg to make it easy to carry, a strap to hold it together and I can now carry all the legs in one move instead of the three or so trips normally required.
The new legs take up about 1/5th the space of the old ones.
In the photo the top and bottom pair of legs are the to H legs. The ply strip at bottom under the strap is one of the two that lock the legs together the other is at the top opposite side.. The single legs are stacked alternately so the feet don't touch.
 11th Ave legs by Mike Ruby, on Flickr
I made new legs for the other boards, but realisied that they wouldn't fit one board which has a drop front. I had originally planned to make some clip on cross braces to steady the module so instead made two new H legs (the old ones had extenders to go from 40" to 45" making them more wobbly), this time with ply panels instead of diagonals to steady them. Instead of wasting the space between the legs I have filled it with the single legs. A few bits of ply to lock them together a handle on one leg to make it easy to carry, a strap to hold it together and I can now carry all the legs in one move instead of the three or so trips normally required.
The new legs take up about 1/5th the space of the old ones.
In the photo the top and bottom pair of legs are the to H legs. The ply strip at bottom under the strap is one of the two that lock the legs together the other is at the top opposite side.. The single legs are stacked alternately so the feet don't touch.
11th Ave legs by Mike Ruby, on Flickr
Last edited by Mike_R on Sat Mar 03, 2018 9:31 pm, edited 1 time in total.
Mike Ruby
Re: 11th Avenue
Good idea,
Will have to look at them in 3D sometime soon, and see if I can do something similar. I guess you must have proper pockets in the bottom of your boards, instead of slots to attach these single legs?
Koos
Will have to look at them in 3D sometime soon, and see if I can do something similar. I guess you must have proper pockets in the bottom of your boards, instead of slots to attach these single legs?
Koos
Koos Fockens -Devon UK. North American Model Railroading
Age is just a case of mind over matter. If you don't mind, then it doesn't matter.
Age is just a case of mind over matter. If you don't mind, then it doesn't matter.
Re: 11th Avenue
Here are photos of the socket. The sockets were modified from the original shallower ones that the H legs fitted in.
The sockets were made deeper.
I added a 9mm plate under the board for the leg to rest again.
A bar across the end of the socket for the leg to brace against as it is tightened.
A plate with bolt to clamp the leg in. The legs are slotted so the bolt does not need to be removed.
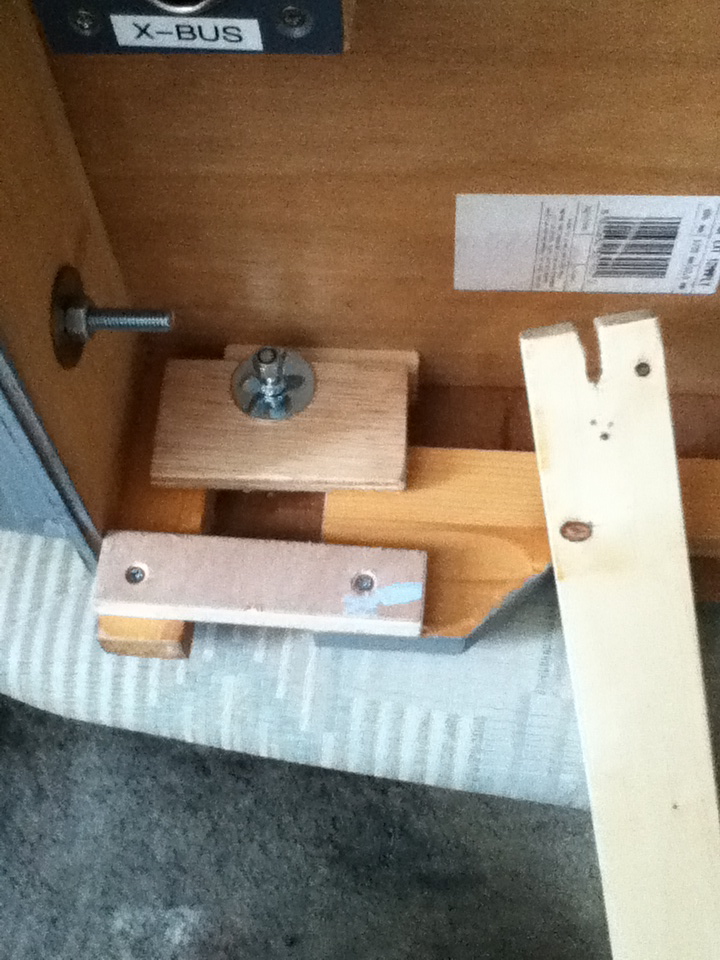 11th Ave leg fitting1 by Mike Ruby, on Flickr
The leg in place, because it braces against the bar it barely moves once the wing nut is done up.
The leg can be inserted at a slight angle making it easier to push in or pull out.
The nylock nut on the bolt end is to stop the wing nut falling off.
 11th Ave leg fitting2 by Mike Ruby, on Flickr
The sockets were made deeper.
I added a 9mm plate under the board for the leg to rest again.
A bar across the end of the socket for the leg to brace against as it is tightened.
A plate with bolt to clamp the leg in. The legs are slotted so the bolt does not need to be removed.
11th Ave leg fitting1 by Mike Ruby, on FlickrThe leg in place, because it braces against the bar it barely moves once the wing nut is done up.
The leg can be inserted at a slight angle making it easier to push in or pull out.
The nylock nut on the bolt end is to stop the wing nut falling off.
11th Ave leg fitting2 by Mike Ruby, on Flickr
Last edited by Mike_R on Sat Mar 03, 2018 9:29 pm, edited 1 time in total.
Mike Ruby
Re: 11th Avenue
I've not done much recently, except adding a backscene for use at home, mostly made from a previous layout. I had to add one 4' piece, although half of the support timbers came from a panel that was too bad, they have spent the last 8 years or more in the loft!
On the layout itself I have added refuelling equipment, parts of a Heljan kit, there enough bits left over for my home layout.
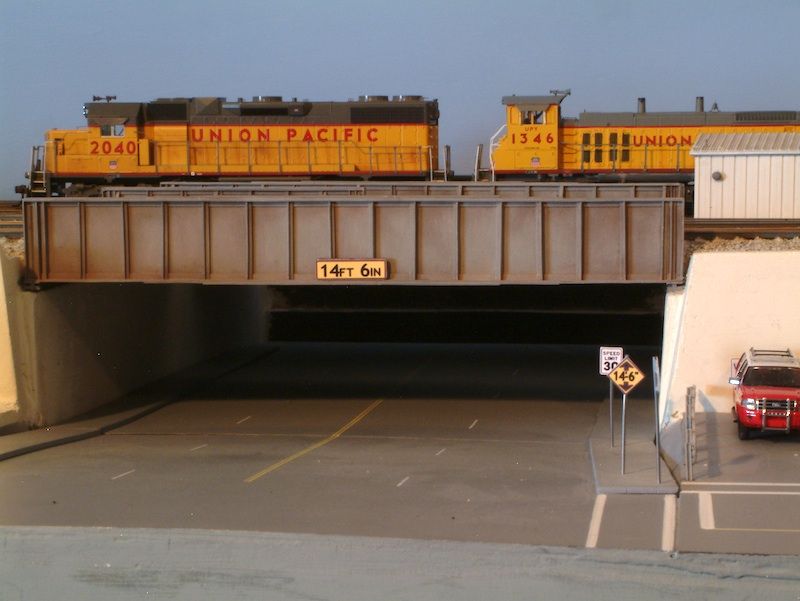
Not anything new, but a view of the underpass with a pair of switchers on the bridge. I plan to cut the other side of the board out so there will a view right through.
On the layout itself I have added refuelling equipment, parts of a Heljan kit, there enough bits left over for my home layout.
Not anything new, but a view of the underpass with a pair of switchers on the bridge. I plan to cut the other side of the board out so there will a view right through.
Mike Ruby
Re: 11th Avenue
For Christmas I decided to fit switch motors to the yard turnouts. Up until now these have been manually operated. Now I use the layout more at home, I've found it a bit of a reach to get to these turnouts, especially the ones at the rear of the layout, not helped by the 5' height and 24" depth.
Koos and Brian have had success with Conrad motors and at £3.99 each they are well priced, so I ordered 10. Even with postage that makes them well under £5 each.
I fitted new switches to the control panel, I already had enough spare connections running through the layout so only had to add wiring between them.
The turnouts were already fitted with microswitches to switch the frog polarity. I ran piano wire links from the existing actuators to the new motors.
I only pulse the power to the motors so haven't bothered setting up the stroke to operate the end of travel switches. I haven't used 16 a.c. as recommended but a +/-12v d.c. supply. This means I only need one wire per motor and a common wire to all, this kept the number of connections within the spares available.
At the same time I wired the electric uncoupler to the panel to make uncoupling easier at the back of the layout.
The photo shows three of the new motors, with one of the existing Fulgurex mainline switch motors, now over 12years old.
 11th Avenue Conrad switch motors by Mike Ruby, on Flickr
Koos and Brian have had success with Conrad motors and at £3.99 each they are well priced, so I ordered 10. Even with postage that makes them well under £5 each.
I fitted new switches to the control panel, I already had enough spare connections running through the layout so only had to add wiring between them.
The turnouts were already fitted with microswitches to switch the frog polarity. I ran piano wire links from the existing actuators to the new motors.
I only pulse the power to the motors so haven't bothered setting up the stroke to operate the end of travel switches. I haven't used 16 a.c. as recommended but a +/-12v d.c. supply. This means I only need one wire per motor and a common wire to all, this kept the number of connections within the spares available.
At the same time I wired the electric uncoupler to the panel to make uncoupling easier at the back of the layout.
The photo shows three of the new motors, with one of the existing Fulgurex mainline switch motors, now over 12years old.
11th Avenue Conrad switch motors by Mike Ruby, on Flickr
Last edited by Mike_R on Sat Mar 03, 2018 9:07 pm, edited 1 time in total.
Mike Ruby
Re: 11th Avenue
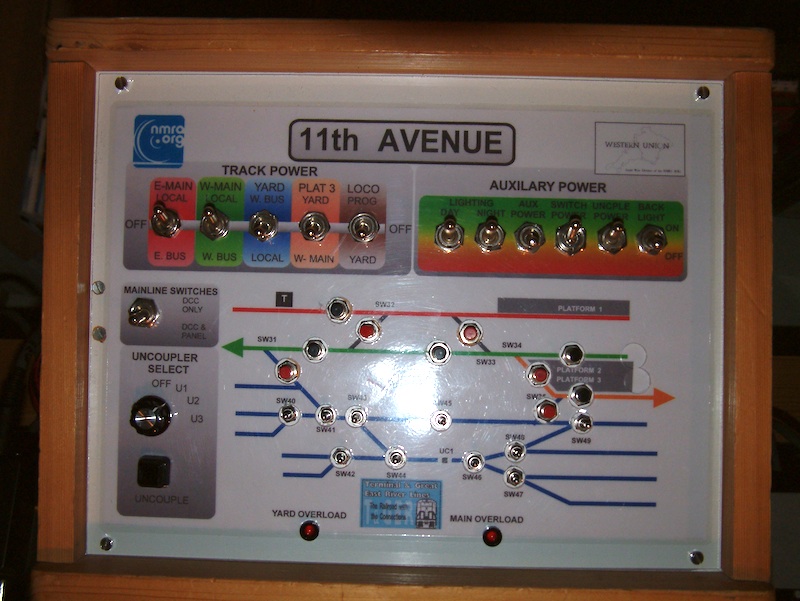
I realised that I have not posted any photos of the control panel. Warning this may scare those afraid of electrics!
When this layout was built we were using d.c., so I broke the track into several blocks. The panel used to be the distribution panel for our old double track modules, where four power blocks were fed into it and then fed to the mainline and yard via the block switches. It has since been modified to run the module as a solo layout or with the new single track modules. The block switches are now normally set for local, a booster is normally connected to that input, but I could take power from a track bus and use that. The auxiliary power switches supply lights, switch motors, uncouplers etc. The panel can be mounted on the front or rear of the layout. When at the front it is upside down to keep the switches the correct way around.
The front has the power and switch controls. The mainline switches use the push buttons and the yard centre biased toggle switches. A printed sheet is placed under an acrylic sheet that is cut out for the switches. The wood framing protects the switches.
 11th Ave panel 1 by Mike Ruby, on Flickr
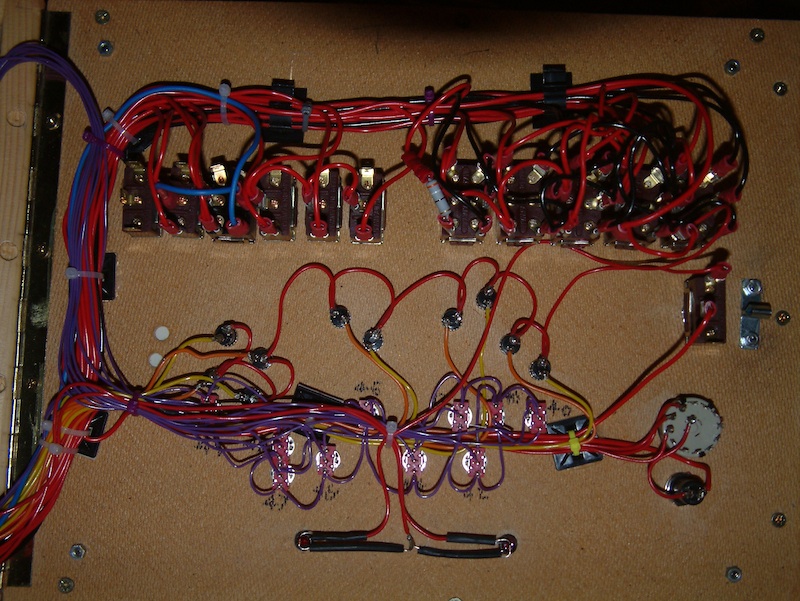
The inside of the front. The front hinges open for access into the panel.
 11th Ave panel 3 by Mike Ruby, on Flickr
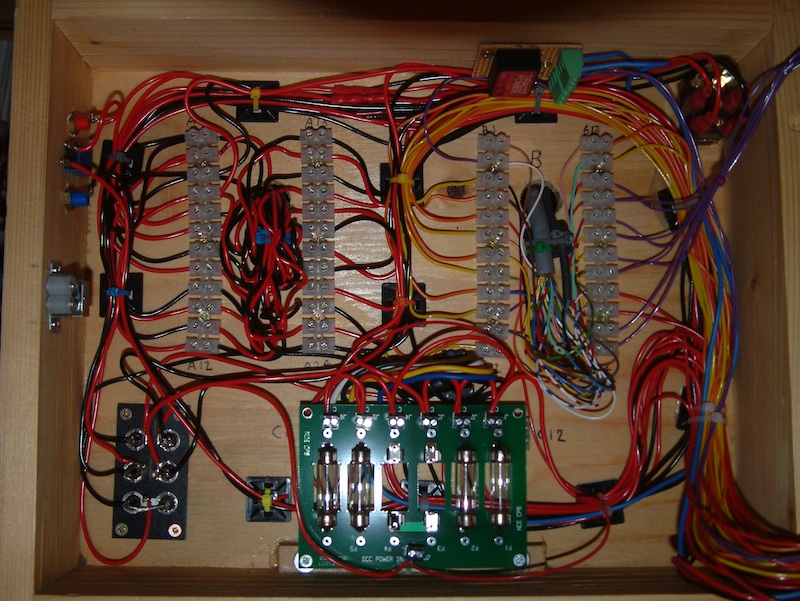
The back has all the connections to the layout. The cables enter through the back and terminate in the connector blocks.
Bottom left are the track power inputs, only one is used now in single track mode. Top right is a switch that sets the panel up for single or double track modes, bottom centre is a NCE cutout unit and at top is the -/+ 12v power supply for the yard switches.
 11th Ave panel 2 by Mike Ruby, on Flickr
When this layout was built we were using d.c., so I broke the track into several blocks. The panel used to be the distribution panel for our old double track modules, where four power blocks were fed into it and then fed to the mainline and yard via the block switches. It has since been modified to run the module as a solo layout or with the new single track modules. The block switches are now normally set for local, a booster is normally connected to that input, but I could take power from a track bus and use that. The auxiliary power switches supply lights, switch motors, uncouplers etc. The panel can be mounted on the front or rear of the layout. When at the front it is upside down to keep the switches the correct way around.
The front has the power and switch controls. The mainline switches use the push buttons and the yard centre biased toggle switches. A printed sheet is placed under an acrylic sheet that is cut out for the switches. The wood framing protects the switches.
11th Ave panel 1 by Mike Ruby, on FlickrThe inside of the front. The front hinges open for access into the panel.
11th Ave panel 3 by Mike Ruby, on FlickrThe back has all the connections to the layout. The cables enter through the back and terminate in the connector blocks.
Bottom left are the track power inputs, only one is used now in single track mode. Top right is a switch that sets the panel up for single or double track modes, bottom centre is a NCE cutout unit and at top is the -/+ 12v power supply for the yard switches.
11th Ave panel 2 by Mike Ruby, on Flickr
Last edited by Mike_R on Sat Mar 03, 2018 9:06 pm, edited 1 time in total.
Mike Ruby
Re: 11th Avenue
Ha! Another Conrad convert 
you can't really fault them for the price, they're not Tortoise, but a lot smaller and a quarter of the price , relatively easy to install and reliable enough it my experience.
Koos
you can't really fault them for the price, they're not Tortoise, but a lot smaller and a quarter of the price , relatively easy to install and reliable enough it my experience.
Koos
Koos Fockens -Devon UK. North American Model Railroading
Age is just a case of mind over matter. If you don't mind, then it doesn't matter.
Age is just a case of mind over matter. If you don't mind, then it doesn't matter.