Detailing an Atlas Trainman GP38-2

New toys to show off? Projects you're working on? Want advice on what (and what not to) get? Try here...
Post Reply
tunnelmotor
Posts: 110
Joined: Fri Jul 03, 2009 7:05 pm

Detailing an Atlas Trainman GP38-2

Post by tunnelmotor »

This is my first attempt at recording progress on a project like a blog so I hope it works for you the reader. This first project is to modify and detail an Atlas Trainman GP38-2 that I acquired secondhand from Dan Spalding at the Armitage Modular Meet in July. It portrays UP #820 in the latest lightning stripe livery.

As ever, when I buy a loco I check it for accuracy against a photo or two of the prototype. That showed there were a number of details that needed to be changed/modified/added/removed. The major research source for this project was:

RR Picture Archives at http://www.rrpicturearchives.net/locopi ... x?id=42798

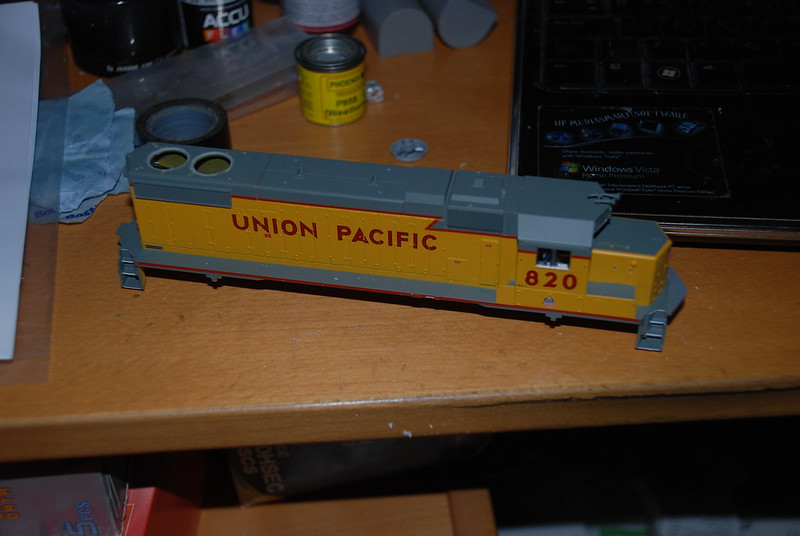
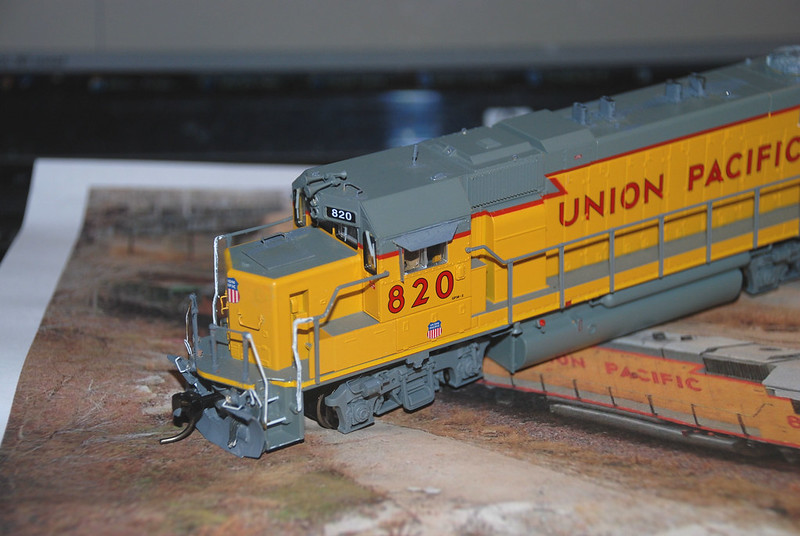
Close examination of the photos there revealed that changes were made to this loco progressively over a period so I needed to decide what period I wanted to model it in. I decided to go for its condition in more recent times after the yellow sill stripe has been added but before the air conditioner was added to the roof as the style of it does not seem to be available as a detail part (yet). The model represents a 1981 build GP38-2, which is towards the end of the production of this model and thus it has, or should have, the later features on that model. Being a Trainman model, you cannot expect it to be too accurate but it is not bad.

Prototype v Model

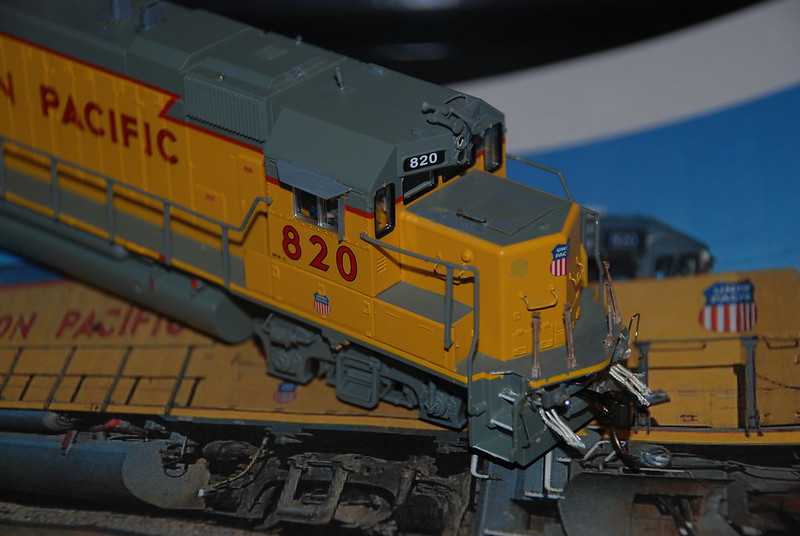
The number #820 represents an ex-MP loco acquired by the UP on acquisition of MP. As far as I know it is still on the UP roster and does not seem to venture very far from Kansas City, judging by the photos of it found on RR Picture Archives. And very good pictures they are too, showing its evolution over quite a short period 2001-13. It started out pretty much as produced by Atlas but acquired yellow sill stripes at some stage and later it acquired an air conditioner unit on the cab roof. So there are two possible additions.

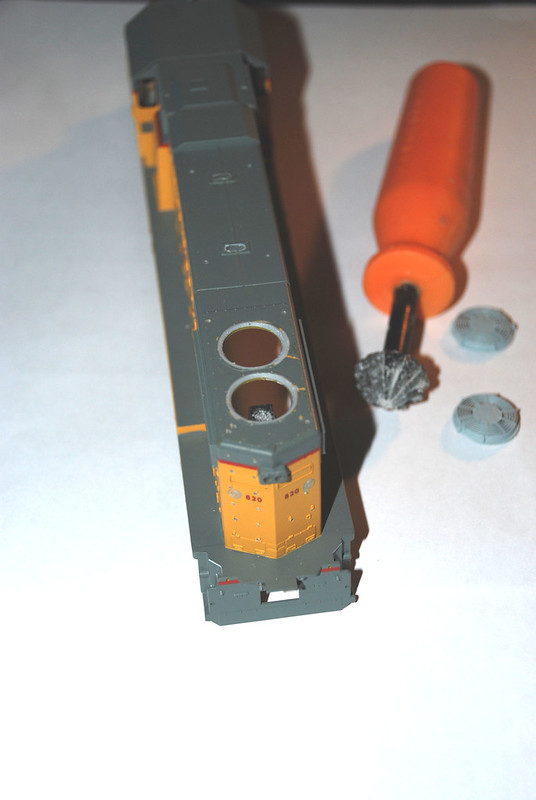
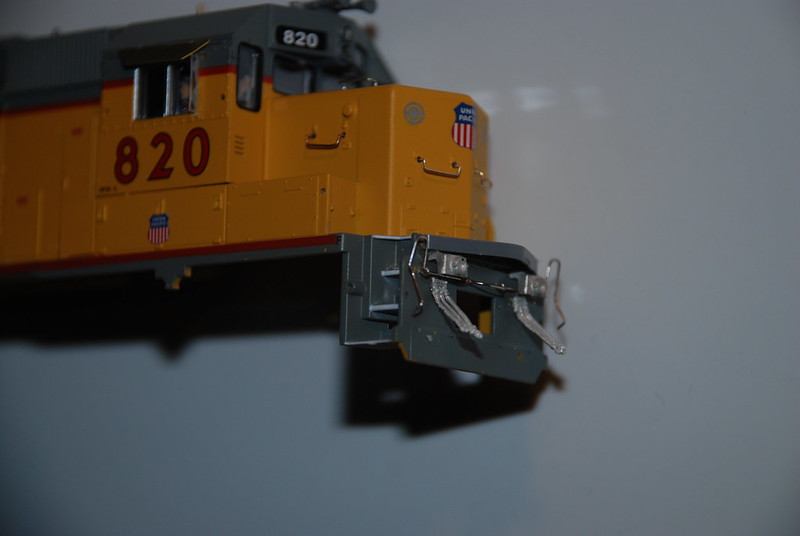
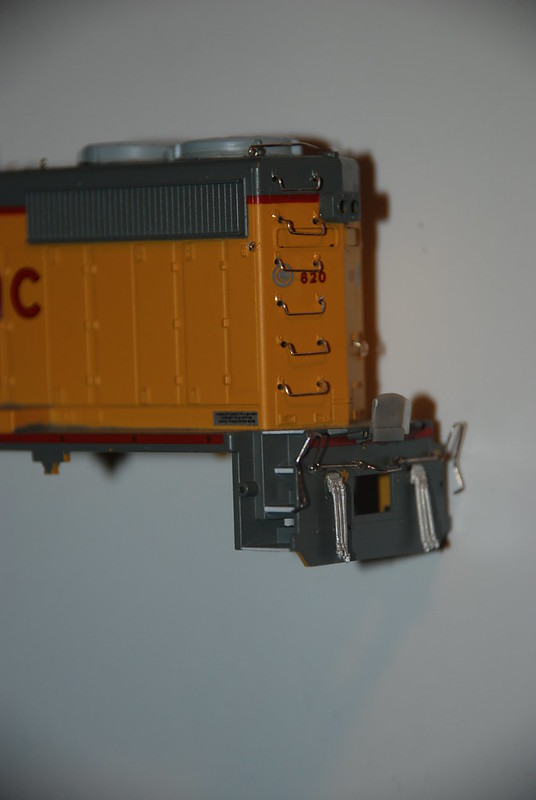
Comparing the model with photos I spotted four immediate differences: the later version anti-climber in a V shape (and not a drop step) as on GP50s then in production; the larger Q fans (domed) rather than 48” flat fans, four tall exhaust ports rather than two short ones, and a toilet hatch on the top of the nose. There are a few other things than can be added for greater levels of detail but see below for that. The plastic representation of a plow had to go too.

This aerial shot looking down shows the roof detail perfectly, especially the over-height exhaust ports and the bent firecracker antenna, just the like the models!
http://www.rrpicturearchives.net/showPi ... ?id=263996

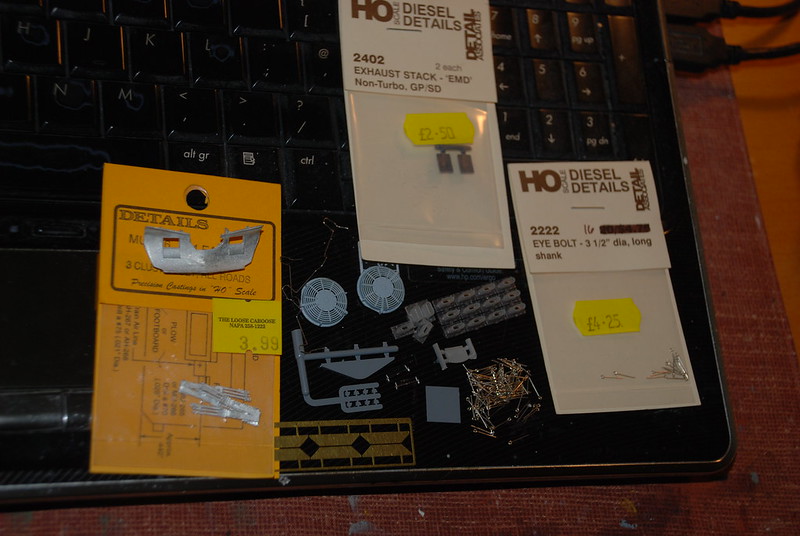
I shall produce a complete list of parts used at the end as the list is likely to grow the more I get into this project - proving it is a "live" job!!! :lol:

More next time
Last edited by tunnelmotor on Wed Oct 01, 2014 9:32 am, edited 4 times in total.
User avatar
torikoos
Posts: 876
Joined: Mon Nov 09, 2009 10:46 pm
Location: Newton Abbot, Devon, UK .
Contact:

Re: Detailing an Atlas Trainman GP38-2

Post by torikoos »

Excellent Mike, that's what I like to see on the forum. An article for RH etc can be compiled from these postings in due course. :-)

I have an Atlas trainman GP38-2 too , that I'm gathering parts for, this time a CP rail version, no 4404. plenty of inaccuracies with that one too, I haven't started the project yet. Just gathering pictures, parts and courage :-)

Koos
Koos Fockens -Devon UK. North American Model Railroading
Age is just a case of mind over matter. If you don't mind, then it doesn't matter.
tunnelmotor
Posts: 110
Joined: Fri Jul 03, 2009 7:05 pm

Re: Detailing an Atlas Trainman GP38-2

Post by tunnelmotor »

Making a start

Remove the body from the chassis and put the chassis to one side. To avoid damaging them, I carefully removed all the handrails from sides, nose and rear end – they are just a force fit. Put to one side and keep safe for putting back on later. They are very nice fine mouldings considering this is a Trainman model, designed for harsher handling.

I like to add lift rings, grab irons and aerials so a start was made carefully removing moulded on details on the roof and drilling out with #74 bit in a twist drill. These will be where the list rings will go. I then drilled out holes for all the grab irons on the nose, rear hood and long hood top. Next were the fans. I drilled a hole in the centre of each and widened that with a scalpel blade. I then got a hand counter sink tool and carefully reamed out all of the old fans down to the top of the long hood. I also removed the exhaust ports leaving the base plates.
Then I moved onto the front and rear pilots and removed the raised tabs where the cut levers would be fastened to the pilot and the pips representing where the mu hoses would go – the plow was ditched as it was not a great version of the real thing. Holes are drilled to take the lift rings that will be threaded onto the cut levers (see later) and a larger twist drill bit is used to open holes in the pilot to take the mu hoses that will be applied later.

Here is a view of the body with work done to this stage (plus a bit more - can you see it?)
Image
DSC_0172 by mikearnold, on Flickr

And here is an end on view with the tool used to ream out the holes for the new see-through fans.
Image
DSC_0175 by mikearnold, on Flickr

The next stage is to remove the drop step on the front pilot. With a razor saw carefully cut across the face of the pilot to remove the drop step and its angled housing, leaving a straight flat edge. Tidy up with a file. Using your favourite solvent apply a new anti-climber, the EMD 50 series part #2105 from the Cannon & Co range. That is the additional item shown above.
Last edited by tunnelmotor on Wed Oct 08, 2014 5:31 pm, edited 2 times in total.
User avatar
torikoos
Posts: 876
Joined: Mon Nov 09, 2009 10:46 pm
Location: Newton Abbot, Devon, UK .
Contact:

Re: Detailing an Atlas Trainman GP38-2

Post by torikoos »

That's a handy reamer tool, where did you find that?
Koos Fockens -Devon UK. North American Model Railroading
Age is just a case of mind over matter. If you don't mind, then it doesn't matter.
tunnelmotor
Posts: 110
Joined: Fri Jul 03, 2009 7:05 pm

Re: Detailing an Atlas Trainman GP38-2

Post by tunnelmotor »

I purchased it somewhere like B&Q for woodworking, making countersunk holes to take screws. I used it before on a tunnelmotor dynamic brake housing and was surprised at its "bite" and perfect circle formation. You just need to ensure it is centred accurately and the resulting hole is not bigger than the new fans you are fitting!
Last edited by tunnelmotor on Tue Dec 29, 2015 1:53 pm, edited 1 time in total.
User avatar
torikoos
Posts: 876
Joined: Mon Nov 09, 2009 10:46 pm
Location: Newton Abbot, Devon, UK .
Contact:

Re: Detailing an Atlas Trainman GP38-2

Post by torikoos »

Thanks Mike, I will keep an eye out for something like that. Seems easier than to drill them out with every increasing drill sizes..
Koos Fockens -Devon UK. North American Model Railroading
Age is just a case of mind over matter. If you don't mind, then it doesn't matter.
tunnelmotor
Posts: 110
Joined: Fri Jul 03, 2009 7:05 pm

Re: Detailing an Atlas Trainman GP38-2

Post by tunnelmotor »

Some more cleaning up of surfaces was then needed to be able to mount detail parts on the end pilots, front and rear, like cut levers/pin-lifters and mu hoses.

Next I started assembling all the parts I would need to add to the loco:

new plow and mu hoses (Details West); cab shades (A-line); exhaust ports (Shapeways - more on that below as Detail Associates ones were too short!); eye bolts, drop step, cabside deflectors/mirrors (Detail Associates), toilet hatch and EMD 50 series anti-climber (Cannon & Co) and Q fans (Athearn spares from an SD50 but otherwise use Detail Associates).

Image
DSC_0434 by mikearnold, on Flickr

Doubtless more things will come to mind as I progress this project - the round toilet vent on the right side of the nose looks too small - I must find a Detail Associates replacement.
Last edited by tunnelmotor on Sun Dec 07, 2014 1:05 pm, edited 2 times in total.
tunnelmotor
Posts: 110
Joined: Fri Jul 03, 2009 7:05 pm

Re: Detailing an Atlas Trainman GP38-2

Post by tunnelmotor »

At last some of the detail is going on. Here is Trainman GP38-2 #820 overlaid on a photo of its prototype.

Image
DSC_0741 by mikearnold, on Flickr

The details added thus far are: Q fans, anti-climber, left rings (eye bolts), cab shades, toilet hatch on nose and cab shades. I forgot to mention the drop-style grab irons (Detail Associates part #2202) and wind deflectors (Detail Associates part #2310) which are also added (you might find others in your spares box left over from putting details on other RTR models like the P2K/Walthers GP60). Trainman standard does not include grabirons whereas Trainman Plus does. Another part I realised it needed is the V shaped grab iron (not curved as that is for earlier versions) to the rear of the rearmost fan (Detail Associates part #2218).

I also added the exhaust ports which are not Detail Associates parts but obtained from Shapeways, 3D printers. As you can see from the prototype photo, the exhaust ports are very tall, much taller than the stock Detail Associates ones. I thought about butchering one set and adding the stack to an intact one to double its height but fellow member Dan Spalding saved me all that trouble when he found these on Shapeways:

http://www.shapeways.com/model/1768146/ ... erialId=61

They are Paducah rebuilds for GP10/11s and SD10s and they looked the business. So I ordered them, they arrived and four were fitted. They are not quite as slim as those on the UP model but...it's close enough to create the right effect. I superglued the new exhaust ports on the location of the two that I removed and then the other two each 3mm in front of the first two. As you might see from the photo, they are in a clear plastic. I shall paint the inside a dirty black to ensure they are not in any way translucent.

The final detail added at this stage is an EMD drop step on the rear - the Atlas moulding was carefully removed with a razor saw and the replacement part (Detail Associates #1402 - late style with curved top edge) was glued in place.

Next we shall be attending to various aerials on the cab roof, the pilots front and rear (cut levers and mu hoses) and perhaps adding the new yellow sill stripe....that was added later in its life and before the air conditioner unit was added to the roof. As I said earlier choose your period and always find photos of the prototype to check for accuracy.
Last edited by tunnelmotor on Sun Dec 07, 2014 3:42 pm, edited 1 time in total.
User avatar
torikoos
Posts: 876
Joined: Mon Nov 09, 2009 10:46 pm
Location: Newton Abbot, Devon, UK .
Contact:

Re: Detailing an Atlas Trainman GP38-2

Post by torikoos »

Looking good. Keep the updates coming!
Koos
Koos Fockens -Devon UK. North American Model Railroading
Age is just a case of mind over matter. If you don't mind, then it doesn't matter.
tunnelmotor
Posts: 110
Joined: Fri Jul 03, 2009 7:05 pm

Re: Detailing an Atlas Trainman GP38-2

Post by tunnelmotor »

Now we turn to the details on the cab roof. Examination of the photo of the top of #820 reveals that there is a bent firecracker antenna placed at the rear centre of the roof - I drilled ouit with a #72 bit 4mm from the back edge of the roof and applied a Details West cast brass one (part #RA 157). There is a slo a "tear drop" antenna at back left of the roof too, 4mm from back edge again and 2mm in from slope edge. This is DW part #RA 279, positioned low end forward according to the photo. At front right over the number board is a small Sinclair antenna (DW part #RA 275) This sits centrally above the 2 of #820 in the triangular roof section. Finally there is a grab iron (drop style) above the left number board in line with the straight seem at the front of the cab roof. Drill #72 again and secure with superglue, as I did all the other parts - use the glue sparingly and apply it with a very fine length of brass wire using capilliary action.

I also added the wind deflectors at this stage - they were spare Lifelike P2K ones from a GP60 project. I snipped off the lower fixing leg and drilled a hole in the cabside 1mm in front of the top forward corner of the cab window and glued in place.

Now the pilots fore and aft - I always try to affix cut levers as they add so much detail if you can squeeze them in between anti-climber and plow - so do this before you apply the plow. Drill #75 holes where you removed the detail for the fixing points - this accords fairly closely to the angles on the formed wire cut levers. Now take four eye bolts and thread two onto each end of the cut lever and secure them with superglue at the bends in the wire and let them dangle down at the right angle for placing into the four holes. Hold in the dangling position until the glue goes off then place to one side to really harden. When safe to do so, pick up the cut lever with a pair of fine nose pliers at the bowed pin lift point (i.e. central) and offer it up to the loco body and insert the eye bolts into the four holes - secure with superglue and snip off the excess behind the centre two bolts inside the body. I then applied the mu hoses - 3-hose cluster (DW part# MU 266) - drill out a #64 hole and superglue the hoses in place using the mark of the original mouldings as a guide. Repeat for the rear pilot. When the front pilot mu hoses are secure and the glue hardened, carefully bend them out at 45 degrees to pass through the gates on the plow when we ghet to that stage. The rear mu hoses lie flat against the pilot.

One final detail for the pilot is the ditchlights, UP- style mounted below the anti-climber on the pilot. I used some very finely moulded ones by Sunrise but they are no more so I would recommend Details West again with part #DL 229). Again drill out a suitable hole below the outer edge of the pilot on both sides and superglue the ditchlight into place, ensuring they are both level and pointing 90 dcegrees forwards from the pilot. I will apply a suitable MV Lense lense to each in due course.

Front pilot:

Image
DSC_0745 by mikearnold, on Flickr

Rear pilot:

Image
DSC_0746 by mikearnold, on Flickr
Last edited by tunnelmotor on Sun Dec 07, 2014 3:44 pm, edited 2 times in total.
tunnelmotor
Posts: 110
Joined: Fri Jul 03, 2009 7:05 pm

Re: Detailing an Atlas Trainman GP38-2

Post by tunnelmotor »

Now we are on the last leg - making the loco look pretty again. The first job at this stage was to apply some reflective yellow sill stripes over the traditional UP red sill stripes. I went though my stock of decal sheets and found Microscale #87-1263 for BNSF H3 standard cab repaints and used the thinner of the two stripes. It is best done in sections as the entire length is over 11 cms and that is a lot of very thin decal in one go....Use Microscale Micro Sol to settle the strips down around the sill edges - and do not forget to run the strip into the angle into the footwell (but not across the back of it). The anti-climber and rear pilot were dressed too - it is amazing how modern it makes a classic EMD dash 2 diesl look!

Set aside to dry and harden as the decals are on the most touched part of the loco. Once dry, apply any more Micro Sol to soften and bed down any edges. The loco also has some other additional decals - there is an ownership plaque beside the rear footwell both sides between the last two side stanchions - I found the correct three line "Ownership subject to ..." on a white background on UP sheet #87-1125. When all is dry, open up the holes where the stanchions go and very carefully set the handrail sets back in place on the sides and the rear pilot. The front pilot has a new angled anti-climber and you will have to fashion a new set. We will address this later.

I also thought this was the right time to fit the plow that I had selected. I took the chosen Details West one (part #PL-140), opened up holes on the pilot to take a force fit, drilled out holes on the top edge of the plow to take the grabs (all plows have them - look at photos) and glued the grabs in place.....but then found the plow was way too large with the grabs covering the ditchlights and the cut lever pushing the plow off and then no space to get the coupler boxes back in without breaking something and also set high enough that it did not short on the rails....no it would not work so back to the drawing board.

Looking at photos of the prototype I realised that the UP plow was a bit different - lower sweep on the top edge of the plow making it looks less bulky. I could not see anything in my bits box that matched the look exactly - same in the Details West catalogue. So I had a good look at what ones I had and found another plow (Details West #PL-234) that looked a bit less bulky and filed some of the top edge off so that it was shallower and less angled upwards and outwards. I also opened out the cut out for the draft coupler gear with a needle file. It looks better and should not run the risk of shorting the track when installed on the loco. I offered it uup and it fits better - this will be installed later.

I decided to do the paint touch-ups now as I needed to paint the ditchlights and insert the MV lenses before the plow is secured in place. I could not match the UP grey on the loco to anything I had in my paint box professing to be Harbor Mist Gray. But fortunately a close match was neutral grey XF-53 by Tamiya. This was duly applied along with Pollyscale Armor Yellow.

So here is the loco now, with extra parts touched up, most handrails back in place, back on the chassis, coupler boxes applied (#26 Kadee on front) and secured (but no plow yet):

Image
DSC_0748 by mikearnold, on Flickr

Some touching up of paintwork under the sill line is needed - see the jacking pad in the above photo for the yellow showing through and the chassis is black gloss!

For the front pilot handrails I am using Smokey Valley cast brass stanchions from a detailing kit for an SD60M (kit #210) - Smokey Valley are available again and do appear in listings in the Walthers catalogue. I buy mine whenever I see them in hobby shops in the USA when on holiday. I drilled out suitable sized holes to take the end stanchions - they are the ones with mounting spigots pointing downwards (not backwards) for mounting into the top surface of the new anti-climber. Handrails will be fashioned from brass wire bent to shape.

I might even replace all the other handrails with Smokey Valley if they look too chunky after all the work is finished.
Last edited by tunnelmotor on Sun Dec 07, 2014 3:45 pm, edited 2 times in total.
tunnelmotor
Posts: 110
Joined: Fri Jul 03, 2009 7:05 pm

Re: Detailing an Atlas Trainman GP38-2

Post by tunnelmotor »

The last leg of the journey and this will get #820 ready for the road. The final details added are the front handrails, the plow (Details West), some windshield wipers (A-Line and Detail Associates) plus some touching up to do.

The Smokey Valley stanchions were superglued in place and lined up correctly - they were only a loose fit in the previous photo. I delved into my parts box again and located the Smokey Valley handrail kits but none of the spare formed wire matched the V-shaped anti-climber style needed. So I fashioned some plain brass wire (probably about 016") into the style needed using the redundant Atlas moulding as a guide. This I superglued in place on the pilot and behind the stanchions on the anti-climber - the excess witre was snipped off. I painted the wire between the stanchions the Tamiya neutral grey and the lower section reefer white.

The plow was the challenge as it looks like you cannot buy a detail part to match the UP plow attached to #820. Curiosuly Athearn do it right on their Genesis range UP GP50! So I took part #PL-234 and filed the top edge to make a flatter profile - not totally flat but certainly not as flared as it comes. When satisfied that the top of the plow fitted below the line of the ditchlights I superglued in place arond the back of the gap for the mu hoses Detail Associates grab irons so they were just proud of the top edge. This was painted in the Tamiya neutral grey on the rear before putting in place and the front face then painted. The mu hoses were painted a tyre black colour rather than pure black.

Finally the very fiddly bit, the windshield wipers. I drilled #77 holes centrally above each upright window and also at spaces above the central windows above the nose. This needs to be carefully drilled as the measurement needs to be precise to take the Detail Associates part 2319, the tandem arm version for EMD standard cabs. A-Line long wipers were used on the other four windows and all secured with a dribble of liquid cement.

Now all the details are on, motre than I first envisgaed but I just now need to go round and touch up. Armor yellow is a problem as yu can see from the photo in the previous post - out of the bottle it is too mustard and does not match the Atlas factory finish. So I had a trial with some Tamiya flat yellow - too lemon. I then mixed the two yellows 50/50 on a piece of plastic - too yellow and not warm enough. Now I added two tiny drops of SP scarlet and hey presto! Can you see the difference on the nose now?

So that's it, I think. Just a parts list to be completed to sign off - next time!
Image
DSC_0859 by mikearnold, on Flickr

Image
DSC_0860 by mikearnold, on Flickr
Last edited by tunnelmotor on Sun Dec 07, 2014 3:47 pm, edited 1 time in total.
tunnelmotor
Posts: 110
Joined: Fri Jul 03, 2009 7:05 pm

Re: Detailing an Atlas Trainman GP38-2

Post by tunnelmotor »

The parts list:

Cannon & Co part #2105 EMD GP50 series anti-climber
Cannon & Co part #1102 toilet hatch
Detail Associates part #1402 Drop step
Detail Associates part #2007 52" Q fans
Detail Associates part #2202 drop-style grab irons
Detail Associates part #2218 V-shape long hood grab iron
Detail Associates part #2222 eye bolts
Detail Associates part #2310 cabside wind deflectors
Detail Associates part #2319 EMD tandem windshield wipers
Details West part #RA-157 firecracker antenna
Details West part #RA-275 small Sinclair antenna
Details West part #RA-279 small teardrop antenna
Details West part #MU-266 mu hoses - 3-hose cluster4
Details West part #PL-234 plow
Microscale decal sheet #87-1263
Shapeways GP10 Paducah rebuild exhaust stacks : http://www.shapeways.com/model/1768146/ ... erialId=61
Kadee #26 front coupler
0.016" brass wire
A-Line long windshield wipers (4 off)
A-Line cab shades (or Details West part #SV-365 cab sun visors)
Smokey Valley stanchions for EMD 50/60 series anti-climber (plundered from an SD60M kit!)

and a good dose of patience. Over and out.

Now to give it a bit of weathering around the exhaust ports.....
User avatar
Gloriousnse
Posts: 529
Joined: Tue Mar 15, 2011 5:32 pm
Location: Exeter, UK
Contact:

Re: Detailing an Atlas Trainman GP38-2

Post by Gloriousnse »

Really good Mike.

If anyone is detailing one that's maybe a bit closer to stock and doesn't already have a stock of common parts, Cal Scale does a detailing pack for the Trainman GP38-2/GP39-2 which I suspect works out slightly cheaper than buying multiple packs of bits:
http://www.bowser-trains.com/history/ho ... mangp.html

Comes with:

Grabs (standard drop grabs, plus one curved one for the back end)
Lift rings
Cut levers
Windscreen wipers
MU hoses
Brake pipe
Martyn Read
User avatar
torikoos
Posts: 876
Joined: Mon Nov 09, 2009 10:46 pm
Location: Newton Abbot, Devon, UK .
Contact:

Re: Detailing an Atlas Trainman GP38-2

Post by torikoos »

Liking it :-) (For absence of a 'Like' button).

I have a Trainman GP38-2 in CP rail livery , that is in the (long) pipeline to be detailed at some point.
So much to do, so little time….
Koos Fockens -Devon UK. North American Model Railroading
Age is just a case of mind over matter. If you don't mind, then it doesn't matter.
Post Reply